Thursday, September 27, 2012

CTRL-ALT-DEL

A couple of things arose today in connection with the university's new Windows 7 service. Our lab machines, for reasons I won't go into because I can only vaguely remember them, are set up as staff PCs rather than student PCs. This means you can do CTRL-ALT-DEL and lock the screen, which isn't what you want in a student lab (I remember this being a major cause of disputes in Charles Wilson labs during the Windows 3.1 days, when there was fierce competition for machines and students would lock the screen and then go off for an hour to a lecture). There's a simple fix: run gpedit.msc as an administrator, and enable User Configuration / Administrative Templates / System / Ctrl+Alt+Del Options / Remove Lock Computer. This also has the effect of disabling the "Lock" option in the Windows start button (it is still there, it just doesn't do anything).

I was accidentally switched to the new service a couple of days ago, and found that access to the Z drive from both my Linux PC, and the Windows 7 virtual machine I run on it, no longer work (the X drive still works, but that seems to still be on older file servers). Pending the resolution of that problem, a new PC fell off the back of a lorry and I am back to having two computers on my desk, one running Linux and one Windows 7 (which I think we are officially supposed to call "UOL" because there are no other things associated with the University of Leicester which might use the initials "UOL" and it will not be at all confusing). Linking them using synergy:

Linux

From this page. I had to install a newer version of synergy (1.4, the current Ubuntu version is 1.3).

In the instructions below, EG-PC845 is the Linux box which will be running the server, and EG-PC1184 is the Windows machine.

As root, create /etc/synergy, and put this lot into /etc/synergy/synergy.conf:

section: screens
    EG-PC845:
    EG-PC1184:
end
section: links
    EG-PC845:
        left = EG-PC1184
    EG-PC1184:
        right = EG-PC845
end

Then put this lot into /etc/synergy/startsynergys, followed by chmod +x /etc/synergy/startsynergys to make the file executable:

#!/bin/bash

/usr/bin/synergys -c /etc/synergy/synergy.conf -n EG-PC845

And finally, append this to /etc/lightdm/lightdm.conf:

greeter-setup-script=/etc/synergy/startsynergys

The synergy server will now start when the machine boots.
Windows

Install synergy as normal, setting it up to start as a client when the machine does, and connect to the IP address of EG-PC845. The only remaining problem is to do CTRL-ALT-DEL to log on to Windows 7, because you are no longer using the keyboard attached to the PC. The solution is to use gpedit.msc again, as described here: enable Local Computer Policy / Computer Configuration / Administrative Templates / Windows Components / Windows Logon Options, with the option "Services and Ease of Access applications". CTRL-ALT-PAUSE then works in place of CTRL-ALT-DEL.

Thursday, July 26, 2012

Looking ahead

As the previous post suggests, I've been thinking about Twitter bots today, and in particular how to post lengthy text in 140-character chunks. A diversion was to think about how to "read ahead" - I wanted to be able to say "if the next chunk of text will take me over the 140-character limit, don't read it in". But I can't do that without reading it in (I could of course read the whole file into an array, then use pop() and append() to treat it as a stack, but I want to avoid having to read in the whole file if possible). A solution is below:
#!/usr/bin/python

from tempfile import mkstemp
import shutil
import os

ifpath = "a.txt"

fh, ofpath = mkstemp()
ofile = open(ofpath, "w")
ifile = open(ifpath)

lines = []
length = 0

while True:
    previous = ifile.tell() 
    line = ifile.readline()
    if length + len(line) < 140:
        lines.append(line)
        length += len(line)
    else:
        ifile.seek(previous)
        print lines
        break

for line in ifile:
    ofile.write(line)

ifile.close()
ofile.close()
os.remove(ifpath)
shutil.move(ofpath, ifpath)
This opens a.txt for reading (as ifile), and creates a temporary file (ofile). There's then an infinite loop - each time round, I store the current file location as previous, read in a new line, and check to see if that would take it over the limit. If not, I add the new line to the stored array. If it will go over the limit, I use ifile.seek() to go back to the file location before I read in the new line, and then print out the lines stored so far. All that remains is to write the unread lines (including the one I read in and decided not to use) to a temporary file, remove the original a.txt, and replace it with the temporary one.

Wednesday, July 25, 2012

Twitter Updating

Revised version of the code I originally wrote about here. The main difference is that I've included a counter so it doesn't post more than two tweets every time it is run (and since it only runs once an hour, this shouldn't make it too antisocial even when it hasn't run for a while and there are a lot of items in the RSS feed).
#!/usr/bin/python

import tweepy
import feedparser
import urllib
import urllib2

url = "http://www2.le.ac.uk/departments/engineering/news-and-events/blog/RSS"

oauth_file = open("access_token.txt", "r")
oauth_token = oauth_file.readline().rstrip()
oauth_token_secret = oauth_file.readline().rstrip()

consumer_file = open("consumer_keys.txt", "r")
consumer_key = consumer_file.readline().rstrip()
consumer_secret = consumer_file.readline().rstrip()

bitly_file = open("bitly.txt", "r")
bitly_username = bitly_file.readline().rstrip()
bitly_apikey = bitly_file.readline().rstrip()

bitly_base = "http://api.bit.ly/v3/shorten?"
bitly_data = {
    "login" : bitly_username,
    "apiKey" : bitly_apikey,
    "format" : "txt",
    "longUrl" : ""
    }

already_done = []
done_file = open("done.txt", "r")
for line in done_file:
    already_done.append(line.rstrip())
done_file.close()

auth = tweepy.OAuthHandler(consumer_key, consumer_secret)
auth.set_access_token(oauth_token, oauth_token_secret)

api = tweepy.API(auth)
feed = feedparser.parse(url)

count = 0
for item in feed["items"]:
    url   = item["link"]
    title = item["title"]
    if url not in already_done and count < 2:
        bitly_data["longUrl"] = url
        to_shorten = bitly_base + urllib.urlencode(bitly_data)
        result = urllib2.urlopen(to_shorten).read()
        api.update_status(title + " : " + result)
        already_done.append(url)
        count = count + 1

done_file = open("done.txt", "w")
for url in already_done:
    done_file.write(url + "\n")
done_file.close()

Monday, June 4, 2012

Raspberry Pi

A Raspberry Pi arrived late last week, just before I came away for the bank holiday. So I bought a cheap USB keyboard, checked that an old iPod power supply coupled with a Kindle cable would provide enough oomph (just about), and took the lot to my mother's. Unfortunately the keyboard (PC World Essentials) turned out to be one which won't work. Also, I can't keep coming to my mother's house every time I want access to a TV with an HDMI socket. Here's how I got access to the board via my laptop, which runs both Windows and Ubuntu Linux 12.04 - instructions are for the latter, and while I think the instructions below could be adapted for Windows they would probably be more complex. In any case, if you're going to be doing things with an ARM board running Linux, why wouldn't you also be running Linux on your other machines?

  1. Enable SSH. I paid for an SD card pre-loaded with Debian. Stick the card in the laptop, rename boot_enable_ssh.rc to boot.rc, and put the card back into the Pi before powering up.
  2. Plug the Pi into one of the ports on the back of the wireless router. Using a web browser on the laptop, go to the router's management page and look up the list of attached devices. I found that the Pi was on 192.168.0.3.
  3. Open a command prompt on the laptop, and do "ssh pi@192.168.0.3". Password is "raspberry", and you should be logged on to the Pi.
  4. Update packages: sudo apt-get update followed by sudo apt-get upgrade.
  5. Install a VNC server: sudo apt-get install tightvncserver.
  6. Run the server: tightvncserver - you'll be asked to set a password.
  7. Start a VNC server with a resolution that will fit in your monitor - I used vncserver :1 -geometry 800x600 -depth 24
  8. On the laptop, run vinagre, a VNC client, and choose to connect to 192.168.0.3:1 via VNC - the password you will be asked for is the one you set in step 6, not the password from step 3.
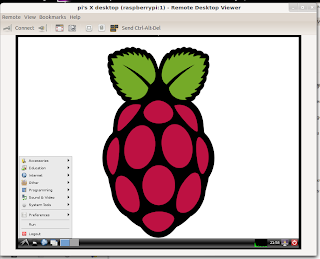
  9. An LXDE desktop should appear:

Friday, January 6, 2012

Lectures

"Students expect lectures", I am told. I think lectures are a rotten way to try to teach programming - it is a practical skill, and you learn (at least at the elementary level) by doing it, not by reading about it. Via the philosophy/politics blog Crooked Timber:


I already subscribe to too many podcasts, but this looks good.

As an aside, this section on teaching physics echoes some of the material on "folk psychology" I studied a couple of years ago as part of an OU philosophy course - "eliminative materialists" think our traditional analysis of mental events ("folk psychology") can be replaced with a more scientific version, just as "folk physics" has been replaced by mathematical physics (and I think Hestenes and Halloun were cited in the paper I read - I'll have to dig it out). If you ask people who haven't studied physics how weights behave in gravity, what happens if you cut a pendulum string, and other similar questions, they'll give the wrong answer. But chuck a ball at them, and they'll catch it (that's "folk physics" - being able to predict how things behave, despite lacking an underlying theory).  What reminded me of the philosophy paper was the observation that even after a course of lectures, most of the students who had in theory been taught mathematical physics were still giving the wrong answers.